Overview
Maxscale is proxy that extends the high availability of MariaDB. MariaDB MaxScale is an advanced database proxy, firewall, and query router. MaxScale is a component of MariaDB Platform. MaxScale is compatible with MariaDB Enterprise Server, MariaDB ColumnStore, and MariaDB Community Server. Let's imagine the following configuration:
- 192.168.10.101 node1
- 192.168.10.102 node2
- 192.168.10.103 node3
- 192.168.10.104 node4
The Cluster will be configured as follows:
Maxscale:
- node1
Galera Cluster:
- node2
- node3
- node4
Configuration
The whole processes will go as follows:
- Install MariaDB and Maxscale on all nodes
- Configure Galera Cluster
- Configure Maxscale
- Feature tests
Setup Repo
Repo Config
[root@node1 ~]#  curl -sS https://downloads.mariadb.com/MariaDB/mariadb_repo_setup | sudo bash
[warning] Found existing file at /etc/yum.repos.d/mariadb.repo. Moving to /etc/yum.repos.d/mariadb.repo.old_1
[info] Repository file successfully written to /etc/yum.repos.d/mariadb.repo
[info] Adding trusted package signing keys...
[info] Successfully added trusted package signing keys
[root@node1 ~]#
Install MariaDB Server
After that we can install the Maria DB
Install MariaDB
[root@node1 ~]# yum -y install MariaDB-server
Loaded plugins: fastestmirror
Loading mirror speeds from cached hostfile
 * base: ftp.cvut.cz
 * extras: ftp.cvut.cz
 * updates: ftp.cvut.cz
mariadb-main                                                                                                                                                        | 2.9 kB  00:00:00
mariadb-maxscale                                                                                                                                                    | 2.4 kB  00:00:00
mariadb-tools                                                                                                                                                       | 2.9 kB  00:00:00
(1/3): mariadb-maxscale/7/x86_64/primary_db                                                                                                                         | 7.1 kB  00:00:00
(2/3): mariadb-tools/7/x86_64/primary_db                                                                                                                            |  14 kB  00:00:00
(3/3): mariadb-main/7/x86_64/primary_db                                                                                                                             |  70 kB  00:00:00
Resolving Dependencies
--> Running transaction check
---> Package MariaDB-server.x86_64 0:10.5.6-1.el7.centos will be installed
--> Processing Dependency: perl(DBI) for package: MariaDB-server-10.5.6-1.el7.centos.x86_64
--> Processing Dependency: libaio.so.1(LIBAIO_0.1)(64bit) for package: MariaDB-server-10.5.6-1.el7.centos.x86_64
--> Processing Dependency: MariaDB-client for package: MariaDB-server-10.5.6-1.el7.centos.x86_64
--> Processing Dependency: perl(Data::Dumper) for package: MariaDB-server-10.5.6-1.el7.centos.x86_64
--> Processing Dependency: galera-4 for package: MariaDB-server-10.5.6-1.el7.centos.x86_64
--> Processing Dependency: MariaDB-common for package: MariaDB-server-10.5.6-1.el7.centos.x86_64
--> Processing Dependency: lsof for package: MariaDB-server-10.5.6-1.el7.centos.x86_64
--> Processing Dependency: libaio.so.1(LIBAIO_0.4)(64bit) for package: MariaDB-server-10.5.6-1.el7.centos.x86_64
Installed:
  MariaDB-compat.x86_64 0:10.5.6-1.el7.centos                                                  MariaDB-server.x86_64 0:10.5.6-1.el7.centos

Dependency Installed:
  MariaDB-client.x86_64 0:10.5.6-1.el7.centos   MariaDB-common.x86_64 0:10.5.6-1.el7.centos   boost-program-options.x86_64 0:1.53.0-28.el7   galera-4.x86_64 0:26.4.5-1.el7.centos
  libaio.x86_64 0:0.3.109-13.el7                lsof.x86_64 0:4.87-6.el7                      pcre2.x86_64 0:10.23-2.el7                     perl-Compress-Raw-Bzip2.x86_64 0:2.061-3.el7
  perl-Compress-Raw-Zlib.x86_64 1:2.061-4.el7   perl-DBI.x86_64 0:1.627-4.el7                 perl-Data-Dumper.x86_64 0:2.145-3.el7          perl-IO-Compress.noarch 0:2.061-2.el7
  perl-Net-Daemon.noarch 0:0.48-5.el7           perl-PlRPC.noarch 0:0.2020-14.el7             socat.x86_64 0:1.7.3.2-2.el7

Replaced:
  mariadb-libs.x86_64 1:5.5.60-1.el7_5
Install MariaDB Client
Install MariaDB Client
Install MariaDB Client
[root@node1 ~]# yum -y install MariaDB-client
Loaded plugins: fastestmirror
Loading mirror speeds from cached hostfile
 * base: ftp.cvut.cz
 * extras: ftp.cvut.cz
 * updates: ftp.cvut.cz
Package MariaDB-client-10.5.6-1.el7.centos.x86_64 already installed and latest version
Nothing to do
[root@node1 ~]#
Setup Galera Cluster
To setup the Galera Cluster, we have to edit the configuration for MariaDB (/etc/my.cnf.d/server.cnf) on: node2, node3 and node4. That configuration is used only for testing, for production, there will be WAY MORE configuration parameters:
Galera Configuration
[galera]
# Mandatory settings
wsrep_on=ON
wsrep_provider=/usr/lib64/galera/libgalera_smm.so
wsrep_cluster_address="gcomm://192.168.10.102,192.168.10.103,192.168.10.104"
binlog_format=row
default_storage_engine=InnoDB
innodb_autoinc_lock_mode=2
The description of these parameters you can check below:
- wsrep_on – This is a session level flag to indicate of the operations we are performing will be replicated, much like how the sql_log_bin setting controls if statements are written to the binlog when using MariaDB Replication. The default of this is ON, but we set it anyway, to be safe.
- wsrep_provider – This points to the location of the Galera library. Although MariaDB is set up to use Galera from scratch, you still have to point to the Galera library. This is installed as part of the MariaDB-Server installation above.
- wsrep_cluster_address – This is where we define the nodes in the cluster, in general you don’t need to list all nodes and new nodes can be added later to a running cluster, but in this case we know what the cluster looks like so we set it up here.
- binlog_format – Although the binlog, in terms of the actual binlog files, isn’t used by Galera, the binlog facility is, and for Galera to work you have to run with row format in the binlog.
- default_storage_engine – Again, this is the default value, but just to be safe let’s set up MariaDB Server to explicitly use the InnoDB Storage Engine, which is the only engine supported by Galera.
- innodb_autoinc_lock_mode – This setting defines how the InnoDB Storage Engine generates values for auto_increment columns. Using mode 2 here is very important for Galera to work properly. In short, mode 2 cause much less locking during auto_increment generation and hence doesn’t interfere with other locking. Values other than 2 can cause deadlocking and other issues with Galera.
After that we can finally bootstrat the cluster ONLY on the first node:
Bootstrap the cluter
[root@node2 log]# galera_new_cluster
[root@node2 log]# ps -ef | grep mysql
mysql    24722     1  2 17:12 ?        00:00:00 /usr/sbin/mariadbd --wsrep-new-cluster --wsrep_start_position=75f4c5af-1488-11eb-9f9a-5b2d1b1d312a:2
root     24749 18744  0 17:12 pts/0    00:00:00 grep --color=auto mysql
[root@node2 log]# ps -ef ^C
[root@node2 log]#
[root@node2 log]# mysql -uroot
Welcome to the MariaDB monitor.  Commands end with ; or \g.
Your MariaDB connection id is 7
Server version: 10.5.6-MariaDB MariaDB Server

Copyright (c) 2000, 2018, Oracle, MariaDB Corporation Ab and others.

Type 'help;' or '\h' for help. Type '\c' to clear the current input statement.

MariaDB [(none)]> show global status like 'wsrep_cluster_size';
+--------------------+-------+
| Variable_name      | Value |
+--------------------+-------+
| wsrep_cluster_size | 1     |
+--------------------+-------+
As you can see we have ONLY one member on the first node. Once that is done start the mysql on the other nodes:
Start the MariaDB on the other Nodes
[root@node3 ~]# service mariadb start
Redirecting to /bin/systemctl start mariadb.service
[root@node3 ~]#
[root@node4 ~]# service mariadb start
Redirecting to /bin/systemctl start mariadb.service
After that, we can see that the members of the cluster increased:
Cluster members
MariaDB [(none)]> show global status like 'wsrep_cluster_size';
+--------------------+-------+
| Variable_name      | Value |
+--------------------+-------+
| wsrep_cluster_size | 3     |
+--------------------+-------+
1 row in set (0.000 sec)

MariaDB [(none)]>
Prepare users for MaxScale
First we need to set up a user that MariaDB MaxScale use to attach to the cluster to get authentication data. On 192.168.10.182, using the MariaDB command line as the database root user:
Create user & Grant permissions
[root@node2 ~]# mysql -uroot
Welcome to the MariaDB monitor.  Commands end with ; or \g.
Your MariaDB connection id is 7
Server version: 10.5.6-MariaDB MariaDB Server

Copyright (c) 2000, 2018, Oracle, MariaDB Corporation Ab and others.

Type 'help;' or '\h' for help. Type '\c' to clear the current input statement.

MariaDB [(none)]> create user 'myuser'@'192.168.10.101' identified by 'mypwd';
Query OK, 0 rows affected (0.023 sec)

MariaDB [(none)]> grant select on mysql.user to 'myuser'@'192.168.10.101';
Query OK, 0 rows affected (0.002 sec)

MariaDB [(none)]> grant select on mysql.db to 'myuser'@'192.168.10.101';
Query OK, 0 rows affected (0.002 sec)

MariaDB [(none)]> grant select on mysql.tables_priv to 'myuser'@'192.168.10.101';
Query OK, 0 rows affected (0.002 sec)

MariaDB [(none)]> grant show databases on *.* to 'myuser'@'192.168.10.101';
Query OK, 0 rows affected (0.002 sec)
MariaDB [(none)]>
Setup MaxScale
The configuration of MaxScale is stored in: “/etc/maxscale.cnf”
Maxscale Config
# Globals
[maxscale]
threads=1
admin_secure_gui=false                 <- We don't have SSL, we aren't so rich.
admin_host=192.168.10.101              <- Defining NIC interface instead of localhst: 127.0.0.1
admin_port=8989                        <- Default port.

# Servers
[server1]
type=server
address=192.168.10.102
port=3306
protocol=MySQLBackend

[server2]
type=server
address=192.168.10.103
port=3306
protocol=MySQLBackend

[server3]
type=server
address=192.168.10.104
port=3306
protocol=MySQLBackend

# Monitoring for the servers
[Galera-Monitor]
type=monitor
module=galeramon
servers=server1,server2,server3
user=myuser
password=mypwd

# Galera router service
[Splitter-Service]
type=service
router=readwritesplit
servers=server1,server2,server3
user=myuser
password=mypwd

# Galera cluster listener
[Splitter-Listener]
type=listener
service=Splitter-Service
protocol=MariaDBClient
address=192.168.10.101
port=3306
It took my REALLY LONG TIME, to figure out the configurations as they change from release to release. Like every open source software….
After that we can start the maxscale:
Start MaxScale
[root@node1 maxscale]# service maxscale start
Redirecting to /bin/systemctl start maxscale.service
Testing the Environment
In our test:
- We will connect to the listener on the maxscale server
- Check the server (e.g. server 3)
- Shutdown the MariaDB on the server from step 2)
- Check the server from our connection (we should be moved)
Session on node1
[root@node1 maxscale]# mysql -h 192.168.10.101 -P 3306 -u myuser -p
Enter password:
Welcome to the MariaDB monitor.  Commands end with ; or \g.
Your MariaDB connection id is 1
Server version: 10.5.6-MariaDB MariaDB Server

Copyright (c) 2000, 2018, Oracle, MariaDB Corporation Ab and others.

Type 'help;' or '\h' for help. Type '\c' to clear the current input statement.

MariaDB [(none)]> show variables like 'hostname';
+---------------+-------+
| Variable_name | Value |
+---------------+-------+
| hostname      | node3 |
+---------------+-------+
Now from the session, connected on node3, shutdown the MariaDB:
Session on node 3
[root@node3 ~]# systemctl stop mariadb.service
Once we shut down the instance, our session should be moved to running server, so let's check it. From the first session, without reconnected, re-query the same data.
Session on node1
MariaDB [(none)]> show variables like 'hostname';
+---------------+-------+
| Variable_name | Value |
+---------------+-------+
| hostname      | node4 |
+---------------+-------+
1 row in set (0.001 sec)
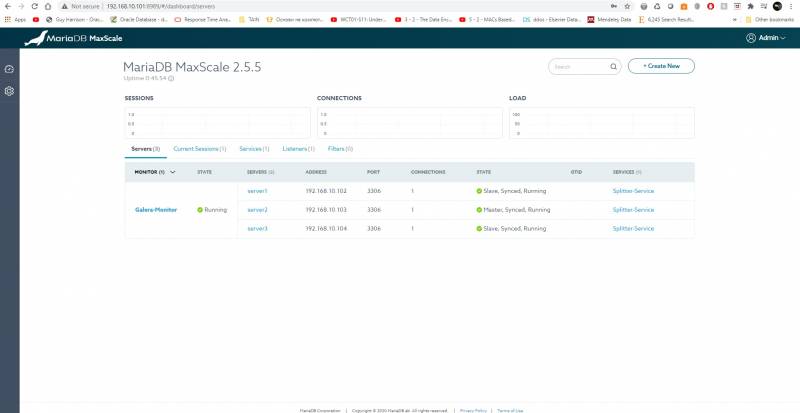
After, we can also connect to the GUI, which should listen on: http://192.168.10.101:8989

